📖
CorgiDude
  • Introduction
  • Specification
  • Installation
    • การใช้งาน Maixpy IDE เบื้องต้น
    • วิธีการลง Maixpy ใน Sipeed Maix Bit
    • การใช้งาน Kflash GUI และการอัพโหลดไฟล์ .bin kmodel
  • Lessons
  • Article & API
    • การใช้งาน GPIO
    • การอ่านและเขียนไฟล์ SD Card
    • การเชื่อมต่อ WiFi
    • การใช้งาน HTTP Request
    • การใช้งาน MQTT
    • การใช้งาน Google Spreadsheet ผ่านทาง IFTTTT
    • การใช้งาน LINE Notify
    • การใช้งาน ThingSpeak
    • การใช้งาน Google Vision
  • Modules
    • Button Switch
    • Drive Motor
    • GPIO Input
    • Servo Motor
  • Demo Projects
    • Face Recognition
      • ตอนที่ 1
      • ตอนที่ 2
      • ตอนที่ 3
      • ตอนที่ 4
    • Image Classification
      • CorgiDude บอร์ด Image Classification โดยใช้ MobileNetV1
      • CorgiDude บอร์ด Image Classification โดยใช้ Transfer Learning MobileNetV1
    • Object Detection
      • CorgiDude บอร์ดกับการทำ Object Detection โดยใช้ Yolo
      • CorgiDude บอร์ด ตรวจจับใบหน้าด้วย Yolo Face Detection
      • CorgiDude บอร์ดกับการทำ Cat Face Detection โดยใช้ Yolo2
      • การทำ Dataset แบบ Object Detection ชนิด VOC ที่สามารถเอาไปใช้ตอนเทรนใน Yolo2 ได้เลย
      • CorgiDude บอร์ดกับการทำ License Plate Detection ของรถมอเตอร์ไซค์ โดยใช้ Yolo2
      • CorgiDude บอร์ด ตรวจจับใบหน้า และ Mask ด้วย Yolo2 Face Mask Detection
  • Downloads
    • Firmware
    • Models
Powered by GitBook
On this page

Was this helpful?

  1. Article & API

การใช้งาน MQTT

Previousการใช้งาน HTTP RequestNextการใช้งาน Google Spreadsheet ผ่านทาง IFTTTT

Last updated 4 years ago

Was this helpful?

หลังจากที่เรา กันไปแล้ว คราวนี้มาถึงคิว MQTT โพรโตคอลยอดนิยมกันแล้วครับ!!

ใน CorgiDude มี chip ESP8285 อยู่ด้วย แต่ Firmware ข้างในเป็นรุ่น AT-Command แต่ว่าไม่ใช่ปัญหาแต่อย่างใด เนื่องจากทาง MaixPy Firmware เอง ได้ implement usocket มาให้เราแล้ว... เราจึงสามารถใช้งาน mqtt library ของ micropython ได้เลยครับ

เริ่มต้นด้วยการ ดาวน์โหลดไฟล์ umqtt.py กันก่อนได้

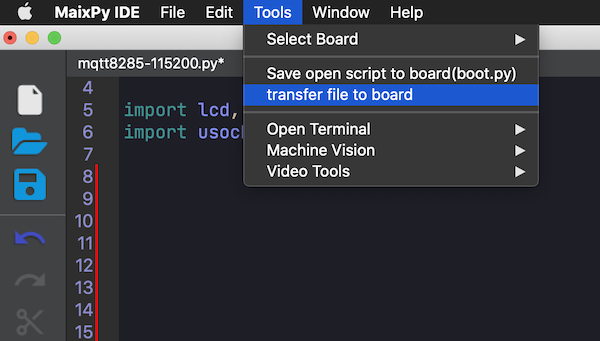
หลังจากนั้นอัพโหลดไฟล์ umqtt.py เข้าไปเลยครับ

หลังจากนั้น ก็มาทดลอง publish และ subscribe กันได้เลยครับ!

import network, time
import time
from Maix import GPIO
from machine import UART
from fpioa_manager import fm, board_info

import lcd, image
from umqtt import MQTTClient

WIFI_SSID = "LiLy_2.4G"
WIFI_PASS = ""

counter = 1
line_height = 20


lcd.init(type=1, freq=15000000)
lcd.freq(16000000)


def draw_line(text, color=lcd.RED):
    global counter
    lcd.draw_string(0, line_height*counter, text, color, lcd.BLACK)
    counter += 1


draw_line("CorgiDude!", lcd.YELLOW)
time.sleep(2)
draw_line("Setting up gpios", lcd.YELLOW)


fm.register(0, fm.fpioa.GPIOHS1, force=True)
wifi_io0_en=GPIO(GPIO.GPIOHS1, GPIO.OUT)


fm.register(8, fm.fpioa.GPIOHS0)
wifi_en=GPIO(GPIO.GPIOHS0,GPIO.OUT)

fm.register(board_info.WIFI_RX,fm.fpioa.UART2_TX)
fm.register(board_info.WIFI_TX,fm.fpioa.UART2_RX)

def wifi_enable(en):
    global wifi_en
    wifi_en.value(en)


draw_line("Preparing NIC...")
uart = UART(UART.UART2,115200,timeout=1000, read_buf_len=4096)

wifi_enable(0)
time.sleep_ms(200)
wifi_enable(1)


def wifi_reset():
    global uart
    print("wifi reset")
    wifi_enable(0)
    time.sleep_ms(200)
    wifi_enable(1)
    time.sleep(2)
    uart = UART(UART.UART2,115200,timeout=1000, read_buf_len=1024)
    tmp = uart.read()
    uart.write("AT+UART_CUR=921600,8,1,0,0\r\n")
    time.sleep_ms(200);
    print(uart.read())
    uart = UART(UART.UART2,921600,timeout=1000, read_buf_len=4096) # important! baudrate too low or read_buf_len too small will loose data
    time.sleep_ms(200);
    print(uart.read())
    uart.write("AT\r\n")
    tmp = uart.read()
    print(tmp)
    if tmp and not tmp.endswith("OK\r\n"):
        print("reset fail")
        return None
    try:
        nic = network.ESP8285(uart)
    except Exception:
        return None
    return nic


nic = wifi_reset()

print(nic)
if not nic:
    raise Exception("WiFi init fail")

nic.connect(WIFI_SSID, WIFI_PASS)

print("connected")

draw_line('')
print(nic.ifconfig())


def sub_cb(topic, msg):
    print((topic, msg))


c = MQTTClient("umqtt_client", "test.mosquitto.org")
c.set_callback(sub_cb)
c.connect()

#c.disconnect()

c.subscribe(b"foo_topic")
count = 0

while True:
    if True:
        # Blocking wait for message
        c.publish(b"foo_topic", b"hello {}".format(counter))
        counter += 1
        c.wait_msg()
    else:
        # Non-blocking wait for message
        c.check_msg()
        # Then need to sleep to avoid 100% CPU usage (in a real
        # app other useful actions would be performed instead)
        time.sleep(1)

c.disconnect()
จะเห็นว่า เราได้รับ message ของตัวเองผ่าน topic foo_topic ได้แล้วครับ

ณัฐ วีระวรรณ์

เริ่มต้น IoT กับ CorgiDude ด้วยการสร้าง HTTP Request ด้วย urequests.py
โดยการคลิ๊กที่นี่